Materials
- 6mm crochet hook
- Chunky acrylic yarn (approx. 175g total)
- Yarn A (Pure black) – 139g
- Yarn B (Washed teal) – 3g
- Yarn C (Blood orange) – 6g
- Yarn D (Buttercup yellow) – 6g
- Yarn E (Tea rose) – 3g
- Yarn F (Blush pink) – 3g
- Yarn G (Midnight blue) – 6g
- Yarn H (Lime green) – 3g
- Yarn I (Lipstick pink) – 6g
Key (UK Terms)
- ch = chain
- sp = space
- st = stitch
- ss = slip stitch
- tr = treble crochet
- *…* = repeat instructions
- beg = beginning
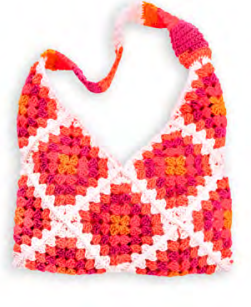
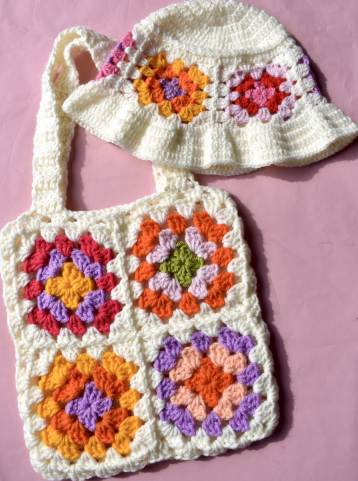
Granny Squares (Front)
Round 1: Ch 4, ss to first ch to form a ring. Ch 3, 2 tr into ring, (ch 2, 3 tr) into ring three times. Ch 2, ss into top of beg ch3. Fasten off.
Round 2: Join new colour into any ch-2 sp. Ch 3, (2 tr, ch 2, 3 tr) in same sp, ch 1, *(3 tr, ch 2, 3 tr) in next ch-2 sp, ch 1* repeat twice more. Ss into top of beg ch3. Fasten off.
Round 3: Join new colour to any corner. Ch 3, (2 tr, ch 2, 3 tr) in same sp, ch 1, 3 tr in next ch-1 sp, ch 1, repeat from * two more times. Ss to beg ch3. Fasten off.
Round 4: Join yarn A in any corner. Ch 3, 2 tr, ch 2, 3 tr, then 3 tr in each ch-1 sp with ch 1 in between. Repeat corners. Ss to beg ch3. Fasten off.
Make 4 squares and join as you go.
Joining Squares
- Complete first square to round 4.
- Work square 2, pausing at the corner after first 3 tr.
- Ch 1, ss into corner of square 1, finish the corner with 3 tr.
- Continue joining sides with ss and 3 tr in square 2.
- Repeat to form an L shape, then close the square group of 4.
Front Border
Work around all 4 joined squares as if it were one large square, inserting 3 tr where two squares join.
Back Square
Work rounds 1 through 9 on a single square, turning at each round.
Assembly
Sew front and back panels together with whip stitch on 3 sides, wrong sides facing.
Top Edge
Join yarn in any st. Ch 3, tr around top edge (74 tr total). Fasten off.
Straps (Front and Back)
Join yarn 12 sts from the left edge. Ch 3, tr 4, ch 3 and turn. Repeat for 30 rows total. Sew the other strap edge 12 sts from the right edge.
Repeat the same for the back panel.
Weave in all ends and enjoy your completed tote bag!