Skill Level: Easy
Measurements: Approx 32″ (81 cm) wide x 16″ (40.5 cm) tall assembled. Approx 16″ (40.5 cm) per Pillow Pal.
Gauge: 12 hdc and 10 rows = 4″ (10 cm)
Materials
- Caron® One Pound™ (16 oz/454 g; 812 yds/742 m)
- Contrast A Grass Green (10620): 1 ball or 626 yds/573 m
- Contrast B Kelly Green (10510): 1 ball or 505 yds/462 m
- Contrast C Black (10503): 1 ball or 20 yds/19 m
- U.S. H/8 (5 mm) crochet hook or size needed to obtain gauge
- Yarn needle
- Two 16″ (40.5 cm) round pillows
Abbreviations
- Approx = Approximately
- Beg = Begin(ning)
- Ch = Chain(s)
- Dc = Double crochet
- Hdc = Half double crochet
- Rep = Repeat
- Rnd(s) = Round(s)
- RS = Right side
- Sl st = Slip stitch
- St(s) = Stitch(es)
- Tog = Together
Pea Pillow (Make 2 Alike)
Front and Back (make alike):
With A, ch 3.
1st rnd: 10 hdc in 3rd ch from hook. Join. (10 hdc)
2nd rnd: Ch 2. 2 hdc in each hdc around. Join. (20 hdc)
3rd rnd: Ch 2. *1 hdc in next hdc. 2 hdc in next hdc. Rep from * around. Join. (30 hdc)
4th rnd: Ch 2. *1 hdc in each of next 2 hdc. 2 hdc in next hdc. Rep from * around. Join. 40 hdc.
5th rnd: Ch 2. *1 hdc in each of next 3 hdc. 2 hdc in next hdc.
Rep from * around. Join. 50 hdc.
6th rnd: Ch 2. 1 hdc in each of next 2 hdc. *2 hdc in next hdc.
1 hdc in each of next 4 hdc. Rep from * to last 3 hdc. 2 hdc in
next hdc. 1 hdc in each of last 2 hdc. Join. 60 hdc.
7th rnd: Ch 2. *1 hdc in each of next 5 hdc. 2 hdc in next hdc.
Rep from * around. Join. 70 hdc.
8th rnd: Ch 2. 1 hdc n each of next 3 hdc. *2 hdc in next hdc.
1 hdc in each of next 6 hdc. Rep from * to last 4 hdc. 2 hdc in
next hdc. 1 hdc in each of last 3 hdc. Join. 80 hdc.
9th rnd: Ch 2. *1 hdc in each of next 7 hdc. 2 hdc in next hdc.
Rep from * around. Join. 90 hdc.
10th rnd: Ch 2. 1 hdc n each of next 4 hdc. *2 hdc in next hdc.
1 hdc in each of next 8 hdc. Rep from * to last 5 hdc. 2 hdc in
next hdc. 1 hdc in each of last 4 hdc. Join. 100 hdc.
11th rnd: Ch 2. *1 hdc in each of next 9 hdc. 2 hdc in next hdc.
Rep from * around. Join. 110 hdc
12th rnd: Ch 2. 1 hdc n each of next 5 hdc. *2 hdc in next hdc.
1 hdc in each of next 10 hdc. Rep from * to last 6 hdc. 2 hdc in
next hdc. 1 hdc in each of last 5 hdc. Join. 120 hdc.
13th rnd: Ch 2. *1 hdc in each of next 11 hdc. 2 hdc in next hdc.
Rep from * around. Join. 130 hdc.
14th rnd: Ch 2. 1 hdc n each of next 6 hdc. *2 hdc in next hdc.
1 hdc in each of next 12 hdc. Rep from * to last 7 hdc. 2 hdc in
next hdc. 1 hdc in each of last 6 hdc. Join. 140 hdc.
15th rnd: Ch 2. *1 hdc in each of next 13 hdc. 2 hdc in next hdc.
Rep from * around. Join. 150 hdc.
16th rnd: Ch 2. 1 hdc in each hdc around. Join. Fasten off.
Join Front and Back: With WS of Front and Back together, join A with sl st to back loops of any hdc. Ch 1. Working through back loops only and through both thicknesses, work sc evenly around, inserting pillow form before fully closing edge. Join with sl st to first sc. Fasten off.
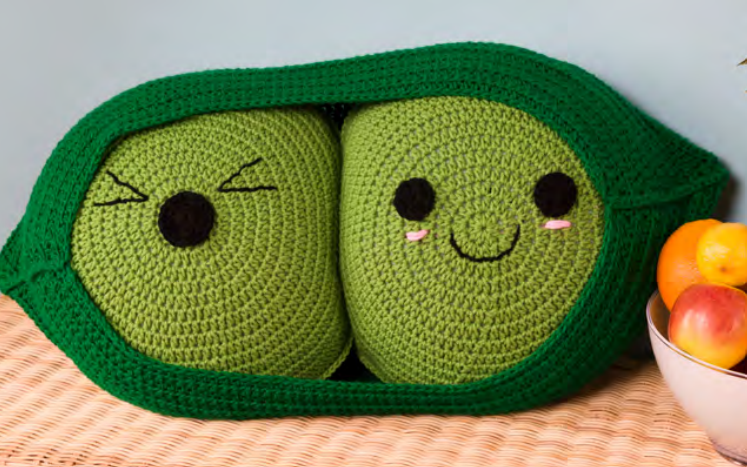
Pea 1 Eyes and Face
With C, ch 4.
1st rnd: 11 dc in 4th ch from hook (ch 3 at beg counts as dc). Join. (12 dc). Fasten off, leaving long end. Sew eyes to Pea 1.
Use Satin Stitch to embroider cheeks. Use Back Stitch to embroider the smile.
Pea 2 Face
Mouth: With C, ch 3.
1st rnd: 10 hdc in 3rd ch from hook. Join. (10 hdc)
2nd rnd: Ch 2. 2 hdc in each hdc around. Join. (20 hdc). Fasten off. Sew mouth to Pea 2.
Use Back Stitch to embroider eyes.
Peapod
Front and Back (make alike): With B, ch 60.
1st row: 2 hdc in 3rd ch from hook. 1 hdc in each ch to last ch. 2 hdc in last ch. Turn. (62 hdc)
2nd row: Ch 2. 1 hdc in first hdc. 2 hdc in next hdc. 1 hdc in each hdc to last 2 hdc. 2 hdc in next hdc. 1 hdc in next hdc. Turn. (64 hdc)
Repeat 2nd row until 94 sts in row.
Then:
Ch 2. 1 hdc in first hdc. Hdc2tog. 1 hdc in each hdc to last 3 hdc. Hdc2tog. 1 hdc in last hdc. Turn.
Next row: Ch 2. 1 hdc in each st to end. Turn.
Repeat last 2 rows until 66 sts in row. Fasten off.
With WS together, join B with sl st at “Start here.” Work sc evenly around the edge to “End here.” Fasten off.
Finishing
Use the Satin Stitch and Back Stitch as shown in this diagram to complete face embroidery.